Article Seven: My text-to-img Journey - Automatic1111 Extensions and Animator
This is the seventh post in a series of articles I have been writing about text-to-image software. In this series, I will talk about how the technology works, ways you can use it, how to set up your own system to batch out images, technical advice on hardware and software, advice on how you can get the images you want, and touch on some of the legal, ethical, and cultural challenges that we are seeing around this technology. My goal is to keep it practical so that anyone with a little basic computer knowledge can understand and use these articles to add another tool to their art toolbox, as cheaply and practically as possible. In this seventh post, we will discuss Automatic1111 custom scripts, extensions, and specifically how to use the Custom Script Animator.
NOTE: You can not install extensions if you have your system set to listen on the network, or in other word, if you started the webUI with the command “./webui.sh –listen” when running Automatic1111. You will need to stop the system and restart it with just the command “./webui.sh” from the local system. This is a safety precaution so people can’t remotely execute code. After the extension is installed and verified you can stop the services and restart as normal, with the “./webui.sh –listen” command.
To install an Extension:

0 | template | countryside, vineyard, grapevines, bunches of grapes, nice pencil drawing, masterpiece | low quality
For more information as well as some demos, tips, and tricks check out the GitHub page here: https://github.com/Animator-Anon/animator_extension
The video at the top of the article is a transformation video that is highly dependent on the model understanding the props. Our model (https://civitai.com/models/41928/8buffgen) was used for this reason because it was trained and mixed for age distinction and we are working on adding some generic features based on nationalities. This is far from perfect, but it works for us. The prompt for the first video is below.
See notes at end of article for video prompts.
General Info on Extensions and Custom scripts:
Extensions allow you to edit and manipulate images through the software, add options to the interface, or just change the way the interface looks. Basically are a more convenient form of user scripts that you can easily install from the UI and all exist in their own folder inside the extensions folder of webUI. It also means you can point and click instead of trying to do everything at the command line. Alternatively you can just copy-paste a directory into extensions. For developing extensions, see Developing extensions. To install custom scripts, place them into the scripts directory and click the Reload custom script button at the bottom in the settings tab. Custom scripts will appear in the lower-left dropdown menu on the txt2img and img2img tabs after being installed. See the link to learn more about custom scripts and manually adding them to folders: https://github.com/AUTOMATIC1111/stable-diffusion-webui/wiki/Custom-ScriptsAdding Extensions through the WebUI:
Before we talk about adding extensions, let's discuss a few points and best practices. Following these will save you a lot of time by avoiding situations where you have to troubleshoot and reset your system.- INSTALL 1 EXTENSION AT A TIME! - Why? Because if you install one extension at a time, and verify things work between each install, it is MUCH easier to troubleshoot. If an extension causes an issue or has a dependency that causes your system not to work properly, it is easier to address than if you just installed five extensions.
- TEST BASIC FUNCTIONS AFTER EACH EXTENSION INSTALL. - You don’t need to test everything, though more testing is better, but at least make sure you can generate an image and it comes out as expected.
NOTE: You can not install extensions if you have your system set to listen on the network, or in other word, if you started the webUI with the command “./webui.sh –listen” when running Automatic1111. You will need to stop the system and restart it with just the command “./webui.sh” from the local system. This is a safety precaution so people can’t remotely execute code. After the extension is installed and verified you can stop the services and restart as normal, with the “./webui.sh –listen” command.
Installation Quick Steps for any Extension:
Let's discuss a quick walk through for the installation step through the Automatic1111 webUI. The steps below show you how to install the Animator exertion, but these steps are the same for most extension installs.To install an Extension:
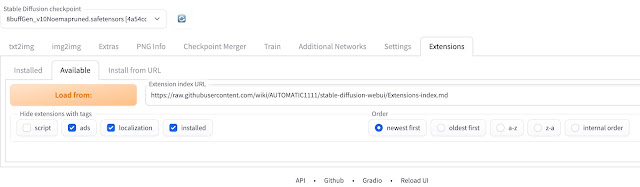
In the WebUI go to tab ‘Extensions’ and the Subtab ‘Available’.

Click on the button: “Load From” to receive the latest extensions.
Find ‘Animator’ and click ‘Install’ (see image below)Wait.

Once it is installed it will disappear from the list.
Some extension will require additional software, configurations, libraries, or models to run properly. Animator requires some additional installs if you want to save files to movies.
If you are running Automatic1111 on windows, see here for details: animator_extension to install FFMPEG. FILM needs to be installed separately, it is not bundled with this extension. Head to https://github.com/google-research/frame-interpolation to get it done.
Once you are complete with the addition installs, go back to the “Installed” sub-tab and click “Apply and Restart UI”

Detailed Installation of Animator:
For more detailed steps of the Animator extension install see the following link for the latest steps on the extensions Github page. https://github.com/Animator-Anon/animator_extension#installation
Remember, there are some additional dependencies that you will need to install as well. If you are running Automatic1111 on windows, see here for details: animator_extension
Remember, there are some additional dependencies that you will need to install as well. If you are running Automatic1111 on windows, see here for details: animator_extension
To create videos, you need FFMPEG installed and available in your path. i.e. open a command line and type in ffmpeg.exe, you should be able to run the program.
On Ubuntu Linux I did not need to install FFMPEG, and followed the FILM install from the link: https://github.com/google-research/frame-interpolation
FILM needs to be installed separately, it is not bundled with this extension. Follow the instructions for your system here: frame-interpolation or hit us up on Patreon for help.
If all went well after restart you will have a new Animator Tab. Remember, before trying Animator out lets make sure everything is working and generate an image.

Animator is a basic img2img script that will generate similar connected images and build a video or GIF file. Fun for creating interesting zoom-in-and-warping movies, but that's about it at this time. Think of it as a high tech flip book. It certainly isn't an easy one shot for generated digital movies, but it can create some interesting effects.
FILM needs to be installed separately, it is not bundled with this extension. Follow the instructions for your system here: frame-interpolation or hit us up on Patreon for help.
If all went well after restart you will have a new Animator Tab. Remember, before trying Animator out lets make sure everything is working and generate an image.

Animator Description and Features:
Now that we have Animator installed, let's discuss what is and what it can and can't do.Animator is a basic img2img script that will generate similar connected images and build a video or GIF file. Fun for creating interesting zoom-in-and-warping movies, but that's about it at this time. Think of it as a high tech flip book. It certainly isn't an easy one shot for generated digital movies, but it can create some interesting effects.
- Transformation - In img2img mode, the picture can be zoomed and panned around to create pull shots, pans and the like. Off-frame sections will be filled in with edge pixels
- Prompt marching - Prompts will be walked from one to the next. The Both prompts will be AND together with opposing weights.
- Seed marching - In txt2img mode, a seed value can be walked to another using subseed strength. It won't be a seamless transition. Parts of the image will change independently in sequence.
Let's use a demo from the Animator Github as a base to do a transformation video.
First chose a model at the top of the Animator tab. We recommend ours, of course (and checkout our newest model here - https://eightbuff.blogspot.com/2024/05/eight-buffalo-media-group-has-shared.html):
The prompt for the video transformation is on the Animator Github page, but also pasted below:
0 | seed | 1
0 | transform | 2 | 0 | 0 | 0
2 | transform | 1 | 200 | 0 | 90
4 | transform | 1 | 0 | 200 | 0
6 | transform | 1 | -200 | 0 | -90
8 | transform | 1 | 0 | -200 | 0
10 | transform | 0.5 | 0 | 0 | 0
Add the above prompt to the 'Keyframs' text box at the bottom of the Animator screen.

Go back up to the top of the screen and make sure you click 'GIF', 'MP4', and 'WEBM' to ensure you get format. Beware these can take up a lot of space!
Now hit the 'Process' button.

10 | transform | 0.5 | 0 | 0 | 0
Add the above prompt to the 'Keyframs' text box at the bottom of the Animator screen.


With all the other settings at default this should generate at 10sec video or GIF file. Process time will vary depending on your setup, but it will take some time. You end product will look something like this, depending on the model you use.
For more information as well as some demos, tips, and tricks check out the GitHub page here: https://github.com/Animator-Anon/animator_extension
The video at the top of the article is a transformation video that is highly dependent on the model understanding the props. Our model (https://civitai.com/models/41928/8buffgen) was used for this reason because it was trained and mixed for age distinction and we are working on adding some generic features based on nationalities. This is far from perfect, but it works for us. The prompt for the first video is below.
NOTE: Make the video at least 35 seconds long for the full effect.
0 | template | award winning photo, portrait, perfect detailed face, Intricate, High Detail, white wall background, Sony 50mm lens, white shirt, solo focus, | NSFW, ((Bindi)), hat, tie, necklace, earrings, text, watermark, signatures,
0 | template | award winning photo, portrait, perfect detailed face, Intricate, High Detail, white wall background, Sony 50mm lens, white shirt, solo focus, | NSFW, ((Bindi)), hat, tie, necklace, earrings, text, watermark, signatures,
0 | prompt | stunning (ethiopian female) smiling, 2 years old, |
5 | prompt | stunning (ethiopian female) smiling, 12 years old, |
10 | prompt | stunning (ethiopian female) smiling, 22 years old, |
15 | prompt | stunning (ethiopian female) smiling, 32 years old, |
20 | prompt | stunning (ethiopian female) smiling, 42 years old, |
25 | prompt | stunning (ethiopian female) smiling, 52 years old, |
30 | prompt | stunning (ethiopian female) smiling, 62 years old, |
35 | prompt | stunning (ethiopian female) smiling, 72 years old, |
You can subscribe to our new YouTube Channel as we continue to expore video creation how-to videos in the future!
You can subscribe to our new YouTube Channel as we continue to expore video creation how-to videos in the future!
If you run into issues, we are happy to help our Pateron supports with advise and tips: https://patreon.com/EightBuffaloMediaGroup
To summarize, extensions are a simplified way to add more capabilities to your generative capabilities but they can still be challenging to get up and running. Thank all the people who manage these open source projects that make your work a little easier. Test your tools and your work though installs. Once everything is working, do be afraid to play with the setting and see what you can create. As always, be creative with your prompts, you never know what images the computer may provide that inspire you in new and different ways.


Comments
Post a Comment